
Contents
In this article, we’ll discuss what key body measurements are needed for apparel pattern making. You’ll learn how to take these measurements, how to source measurements and body data, and how they relate to building patterns and creating grading.
What are Body Measurements?
Body measurements refer to measuring the actual person (or people) who will wear a garment. These are different from garment measurements and can be taken manually or purchased from different body data services. Many body measurements are important to building a balanced, well-fitting garment. Some of these measurements are more important - we’ll call them “Key” or “Primary” measurements, while others - called “secondary” measurements, are still a factor in pattern creation, but are less essential to the fit of the garment.
How to Take Body Measurements?
Even if you are purchasing existing body data in order to create your patterns, you’ll likely still be fitting on fit models, so it’s important to know how to manually take measurements. To start with, you’ll need to make sure you have the right tools.
- Flexible measuring tape (the longer the better - especially if working in tall or plus sizes).
- A second flexible measuring tape with a hook and eyes or snaps or a string or ribbon to mark the natural waist.
- A digital or physical copy of a measurement sheet to nota the measurements.

You’ll also want to make sure that the person you’re measuring is either wearing well-fitting undergarments, or for the comfort of the wearer, they can wear a light, non-compressive pair of leggings and a light, non-compressive tank top. If you’re measuring for a custom garment for a special occasion (such as a formal gown, wedding dress, tux, etc.) you will want to ensure your model is wearing the same shoes and undergarments they will be wearing with the garment as these things can affect the fit.
You want your model to stand up straight, with shoulders and hips parallel to the ground and feet about shoulder-width apart. For circumference measurements, you’ll want the pull the measuring tape snugly, so there is no slack, but not so tight that it distorts the body measurement by pushing or reshaping tissue.
 Oleksandra Baukh
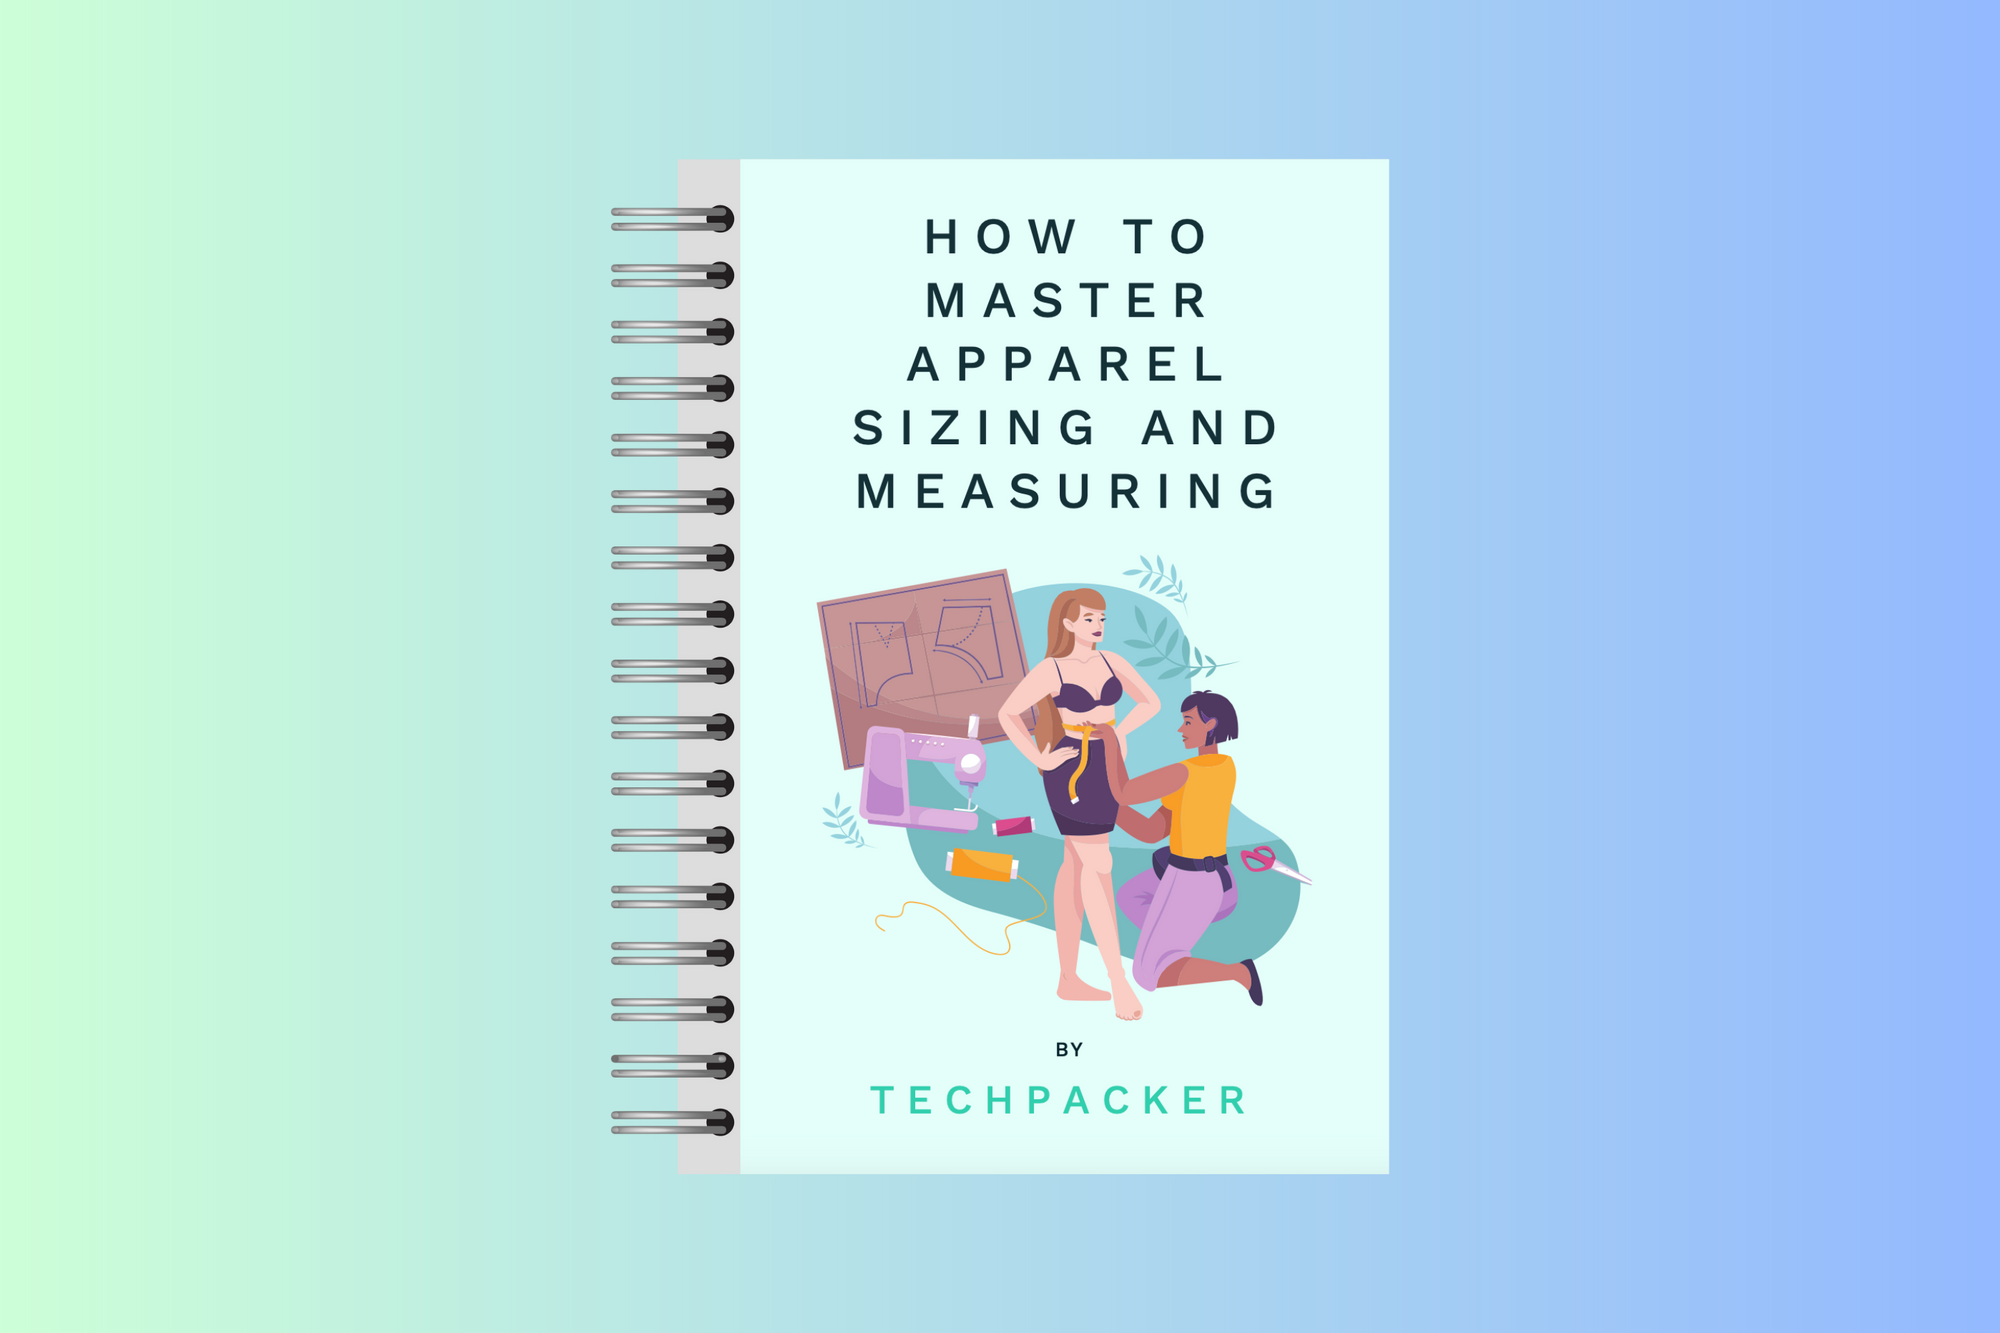
Download our free ebook and master apparel sizing
What are the Most Important Measurements for Pattern Making?
Our key measurements are different depending on the type of garment you’re planning to make. Before we can talk about them, let’s get some common acronyms out of the way.
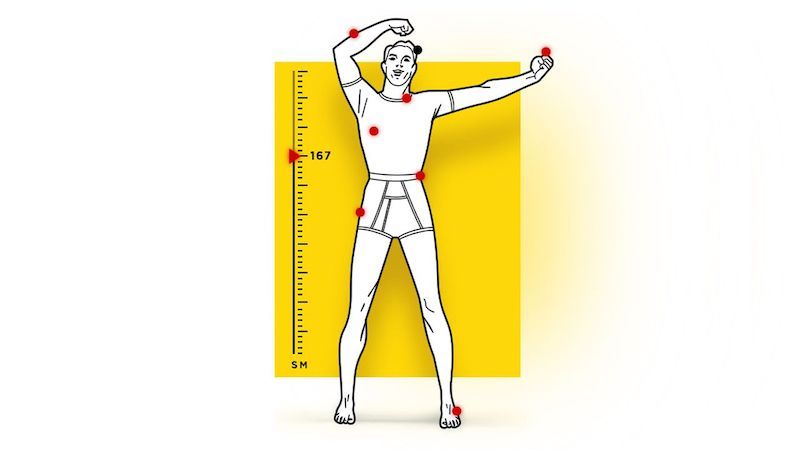
CB - Center Back: refers to the center back of a garment or body, along the spine.
CF - Center Front: refers to the center front of a garment or body from the hollow at the bottom of the neck straight down.
HPS - High Point Shoulder: refers to the top point of the shoulder on either side of the neck.

Let’s go through and define the key measurements and how they relate to pattern-making for specific garment types. Later on, we’ll discuss how to take each of these measurements on the body.
Tops and Dresses
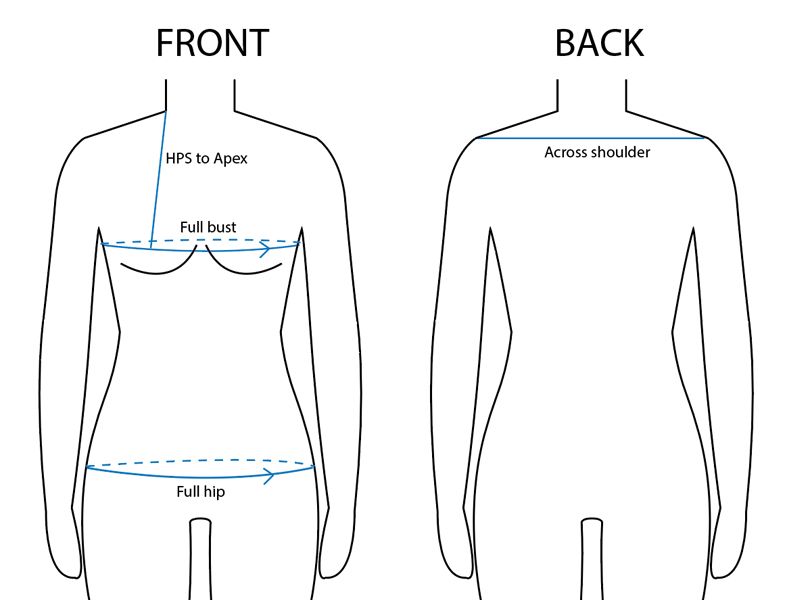
- Full Bust/Chest
- Full Hip
- Across Shoulder
- HPS to Apex
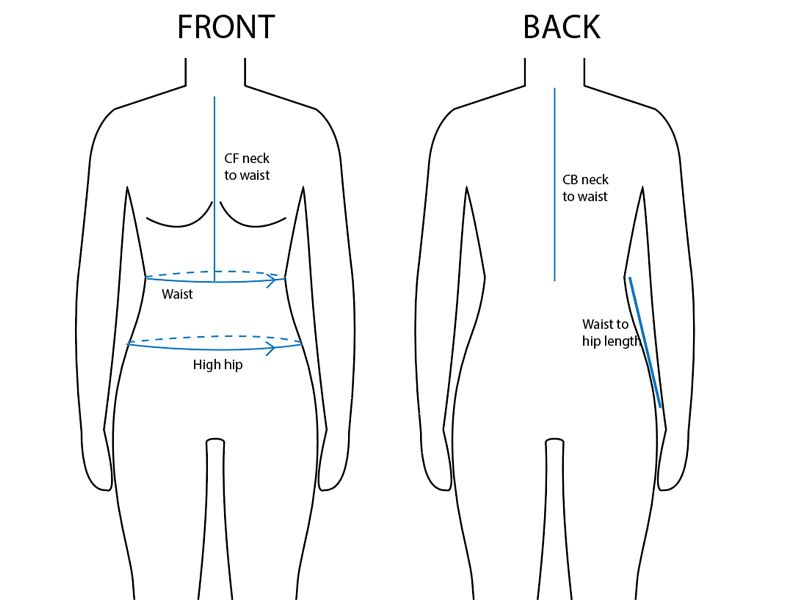
- CB Neck to Waist
- CF Neck to Waist
- Waist to Hip Length
- Additional measurements for dresses only:
- CB neck to floor
- CF neck to floor
Bottoms
- Full Hip
- High Hip
- Waist
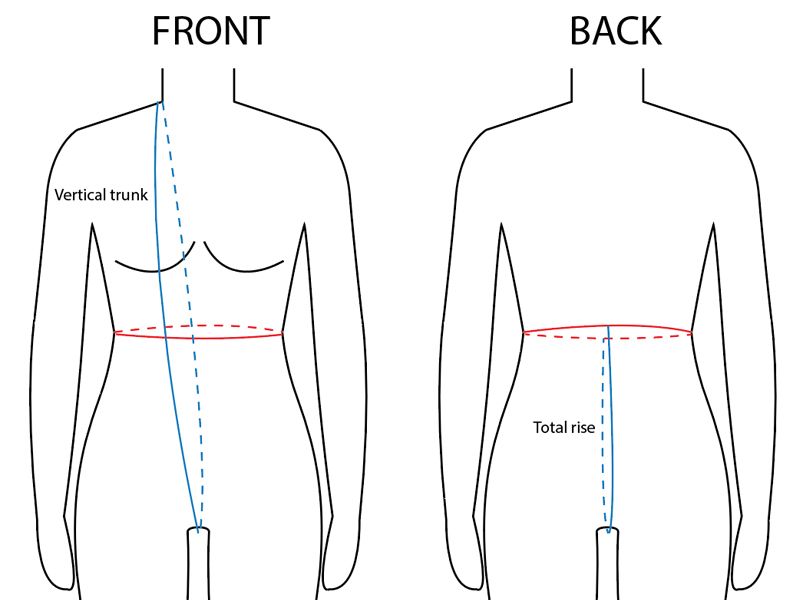
- Total Rise
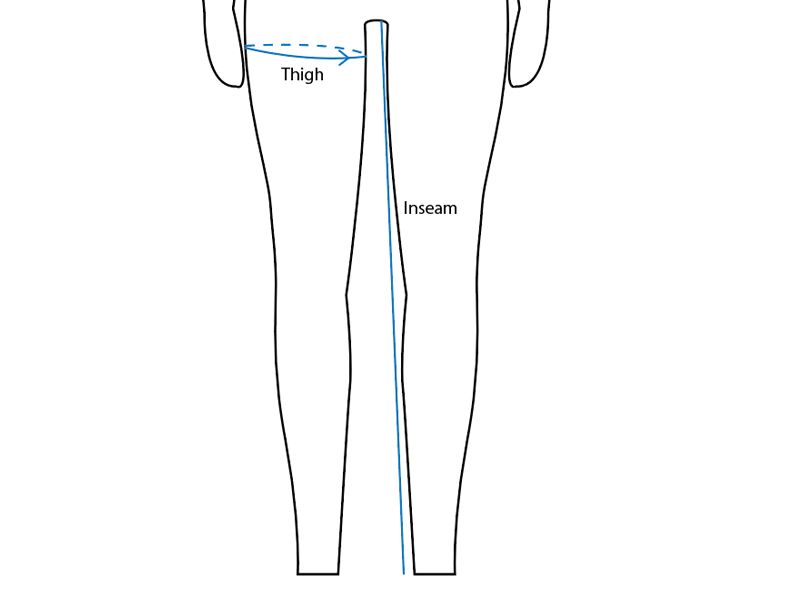
- Thigh
- Inseam
One-Piece Swimsuits, Rompers, and Other One Piece Garments
- Full Bust/Chest
- Full Hip
- Across Shoulder
- HPS to Apex
- CB Neck to Waist
- CF Neck to Waist
- Waist to Hip Length
- Vertical Trunk
Now that we know what key measurements we need for each product type, let’s go over how to take each of these measurements.
Sign up for our FREE membership and get access to
All premium articles
E-courses and ebooks
Ad-free experience
Tech pack templates
How to Take Key Body Measurements
Full Bust/Chest - this is measured at the fullest point of the bust/chest (typically along the apex) around the full circumference of the body, parallel to the floor.
Full Hip - this is measured at the fullest point of the hip (typically at the lower ⅓ of the buttocks), parallel to the floor.
Across Shoulder - measured from shoulder socket to shoulder socket. Sometimes it can be helpful to have the model raise and then lower their arms so you can feel the socket joint.
HPS to Apex - measured from HPS to apex point.
CB Neck to Waist - measured vertically from the C7 vertebrae to the natural waist along the spine.
CF Neck to Waist - measured vertically from the base of the neck to natural waist along the center front of the body.
Waist to Hip length - measured along the natural side of the body from natural waist to full hip level.
High Hip - circumference of the body measured at the hip bones.
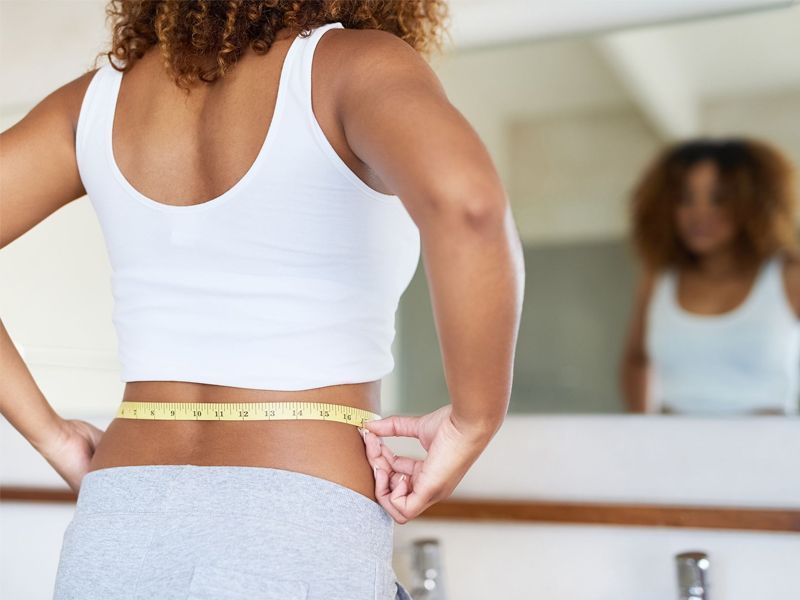
Waist - circumference measured at natural waist. It can be helpful to have the model bend to the side to mark where they bend, this is a natural waist.
Total Rise - wrap the second measuring tape or ribbon around the model at natural waist to mark it. Measure from the CF waist point, through the legs, and up to the CB waist point.
Vertical Trunk - measured from HPS, along the front of the body, around the crotch, and up the back of the body back to HPS.
Thigh - measure around the fullest part of the thigh. Typically 1-2” below the hip joint.
Inseam - measured from the crotch to the floor along the inner leg.
What are Secondary Body Measurements?
Secondary body measurements are still important to pattern making and even more important to grading your pattern later on, so it’s important to be familiar with them. Just like with the Key measurements, they vary depending on the type of garment you want to make a pattern for. The reason for this is that you wouldn’t necessarily need to take a bust cup measurement if you’re making pants, but you’d certainly need to make a bra.
Tops and Dresses
- Underbust
- Waist
- Neck Base
- Across Back
- Across Front
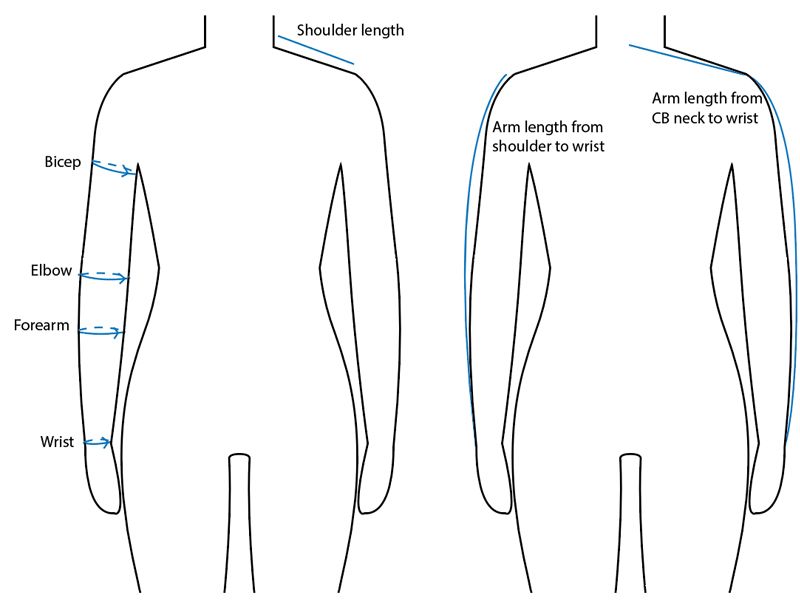
- Shoulder Length
- Arm Length from CB Neck to Wrist
- Arm Length from Shoulder Point to Wrist
- Bicep Circumference
- Elbow Circumference
- Forearm Circumference
- Wrist Circumference
Bras or Swim Tops
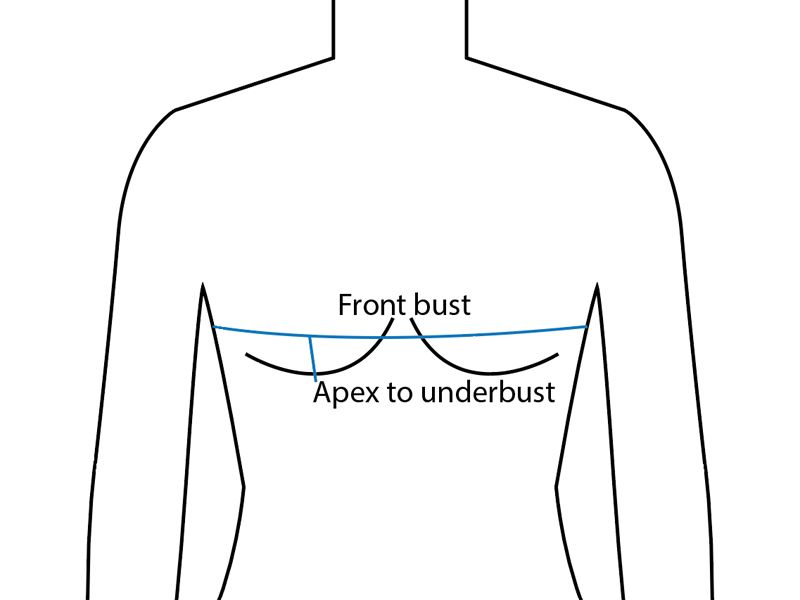
- Front Bust
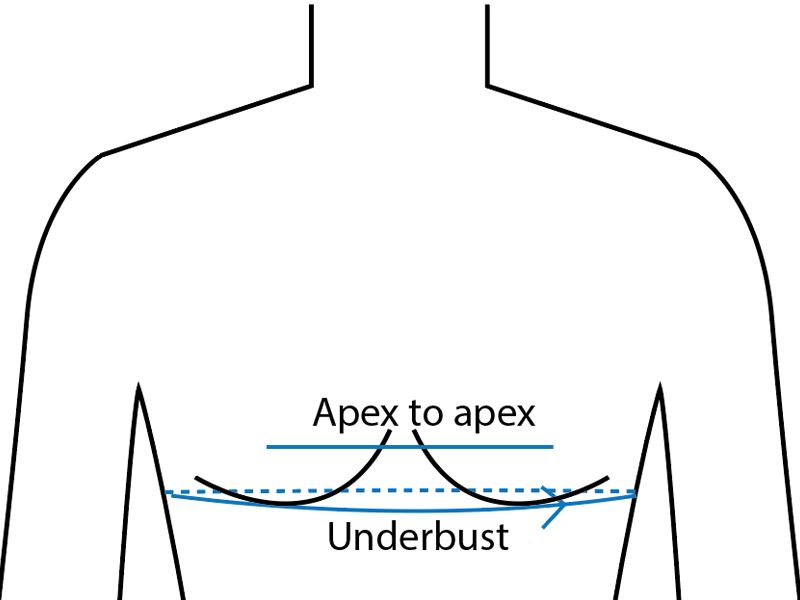
- Apex to Apex
- Cup width
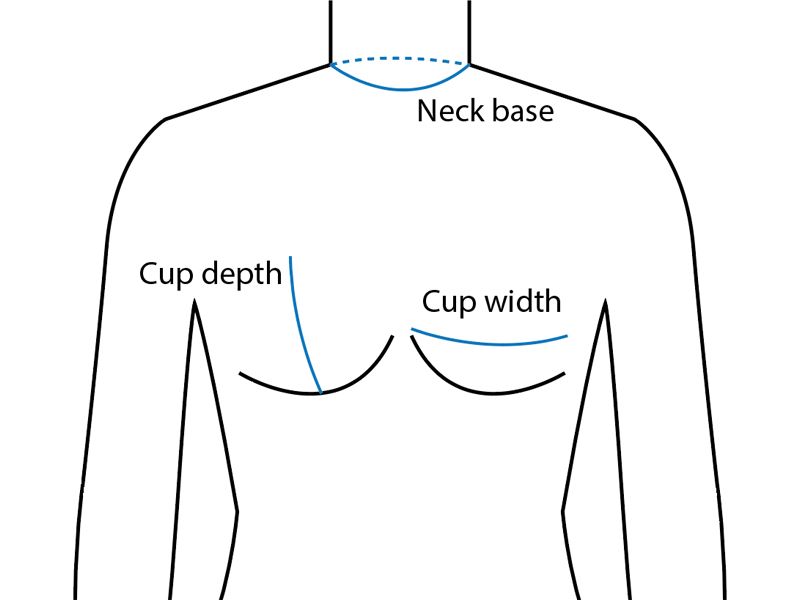
- Cup Depth
- Apex to Underbust
- Underbust
Bottoms
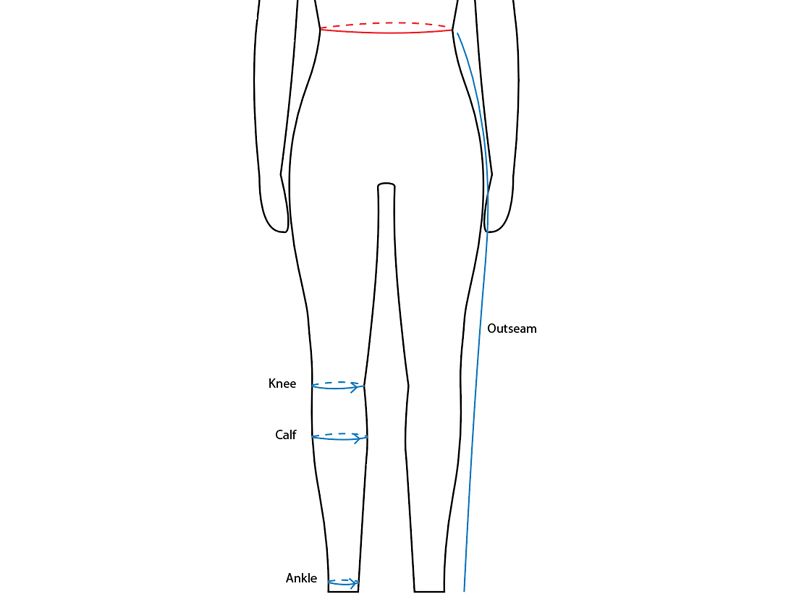
- Knee Circumference
- Calf Circumference
- Ankle Circumference
- Inseam
- Outseam
How to Take Secondary Body Measurements.
Underbust - full circumference measured around the rib cage just under the breast fold.
Apex to Apex - measured from apex point to apex point with measuring tape parallel to the floor.
Front Bust - measured from the natural side of the body, around the apex points to the other side of the body.
Apex to Underbust - measured from the apex point to the breast fold.
Cup width - measured from outside of the breast to inside of the breast along apex.
Cup Depth - measured from the top of the breast to the breast fold, along apex.
Neck Base - circumference of neck measured along the lower part of the neck.
Shoulder Length - measure from HPS to shoulder socket.
Arm Length from CB Neck to Wrist - measured from CB neck (C7 vertebrae) around the shoulder, down the outer edge of the arm, to wrist. The arms should be slightly bent.
Arm Length from Shoulder Point to Wrist - measured from shoulder socket, down the outer edge of the arm, to wrist. The arms should be slightly bent.
Bicep Circumference - measured at the fullest part of the bicep.
Elbow Circumference - measured at the elbow point.
Forearm Circumference - measured at the fullest part of the forearm.
Wrist Circumference - measured at the bony wrist protrusion.
Knee Circumference - measured around the knee cap.
Calf Circumference - measured at the fullest part of the calf.
Ankle Circumference - measured at the bony protrusion at the ankle.
Outseam - measured from natural waist to floor at the side of the body.
What Do You Do With These Measurements?
Once you have these measurements, you’ll create your patterns based on the overall design and fit intention. We’ll go over exactly how to do that in a separate post.
In addition to your base size measurements, you’ll want to take, or buy, measurements for all of the remaining sizes you want to include in your product range. You will need body measurements of all sizes in order to create graded patterns or patterns in all sizes.
Other basic FAQ's
1. What’s the difference between body measurements and garment measurements?
Body measurements refer to the actual dimensions of the person’s body — the raw data used to design a garment that fits properly. Garment measurements, on the other hand, account for design ease, movement, and fit preferences. For example, a shirt’s chest measurement will be larger than the body’s chest measurement to allow for comfort and style.
If you want to see how these measurements translate into pattern shapes, check out our guide on How to Create a Flat Pattern and Apparel Pattern Making: A Guide for Fashion Designers.
2. How do I know which body measurements are most important for my garment type?
It depends on what you’re making. For example, bust, waist, and hip are crucial for tops and dresses, while waist, hip, rise, and inseam matter more for bottoms. Start by defining your product category and silhouette — then identify “key” measurements that define fit.
You can also refer to our Ebook: How to Master Apparel Sizing and Measuring for a complete checklist of standard body measurements by garment type.
3. What’s the right way to take accurate body measurements at home or in a studio?
Always use a flexible measuring tape, have your model stand straight, and ensure the tape is snug but not tight. Measurements should be taken over fitted undergarments or light clothing. Mark the natural waist with a string or ribbon to keep vertical measurements consistent.
If you prefer a visual reference, watch our Mastering Body Measurements: A Fashion Designer’s Guide tutorial to see each measurement demonstrated step-by-step.
4. Where can I source accurate body data if I’m not taking measurements manually?
You can purchase pre-existing body measurement data from digital body scanning or 3D avatar databases. These are especially useful when designing for multiple size ranges or when physical fitting isn’t feasible. Many brands also build measurement libraries over time by averaging data from fit models and past collections.
Once you have your data, you can learn how to translate it into working patterns using our guide on How to Create a Flat Pattern.
5. How are body measurements used to create and grade apparel patterns?
Designers use body measurements to establish the base size pattern — the foundation for all other sizes. Once the base pattern is perfected, it’s “graded” up or down to create other sizes proportionally.
Our detailed blog on Apparel Pattern Making: A Guide for Fashion Designers explains this process, and you can also explore our Ebook on Apparel Sizing and Measuring to understand the relationship between measurement data and grading rules.
6. What are common mistakes to avoid when taking body measurements?
Some of the most frequent errors include using a non-flexible tape, taking measurements over bulky clothes, or misidentifying the natural waist and hip points. Another issue is inconsistency — different people measuring the same body can produce slight variations. Always measure twice, cross-check with a size chart, and note who took the measurement for traceability.
You can learn how professionals maintain consistency in our video Mastering Body Measurements: A Fashion Designer’s Guide.
7. How do body measurements connect to the overall product development workflow?
Body measurements form the foundation of your technical design process — they inform your pattern shapes, fit samples, and grading logic. Getting them right saves time, reduces sample iterations, and ensures better quality control during production.
Once you’ve captured accurate measurements, the next step is transforming them into flat patterns and tech packs. Learn how to do that in How to Create a Flat Pattern and Apparel Pattern Making: A Guide for Fashion Designers.