

Contents
Consumers become increasingly aware of what they purchase. They pay more attention not only to the style but to the quality of what they buy and if a garment is manufactured under the highest possible standards. Most entrepreneurs or design teams who deal with manufacturing encounter multiple quality issues at some point in the production, especially in the early stages when they’re still testing suppliers, factories and materials or when developing new products. Beyond choosing the best possible factory, fabrics and materials, there are other aspects that can make a significant difference in the quality of your garment. One of them is the fit. Our top tips will ensure a great fit for your product and we'll explain how to do it step by step. Also how to use Techpacker to aid the quality control process.
Adding construction details to your technical sketches
Construction details instruct the manufacturer how to sew the garment together. The specifications page (or construction page) includes technical sketches of a garment with callouts. The list usually includes information like pockets, zippers, buttons, collars, embroidery, velcro, flaps, etc. placement.
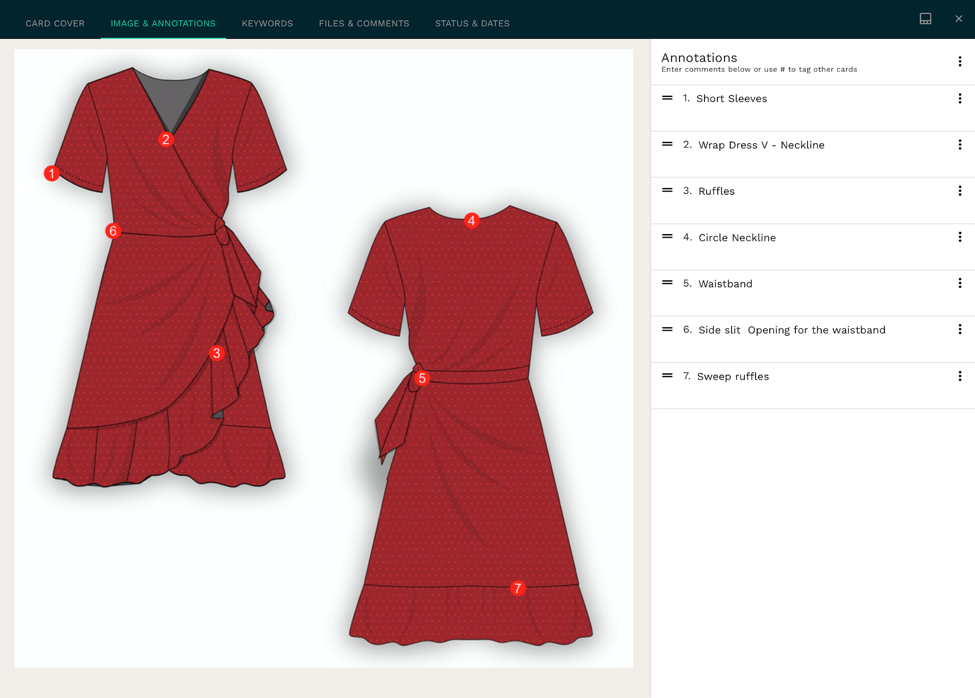
To ensure the quality of a final garment we suggest adding more details to your construction page. Specifying seams, topstitch placement, bonding and how trims are sewn on to fabric are important when it comes to constructing a garment. It will not only make the product look right but also fit right.
To enhance your construction page with more details in Techpacker you can create a custom column and add it as an extension to your technical sketches with callouts.
In our example we indicate the type of stitch (flat seams and blind stitch for the hemline), its width and the number of stitches per inch (SPI). Did you know that there are over 70 types of stitches in the garment industry?
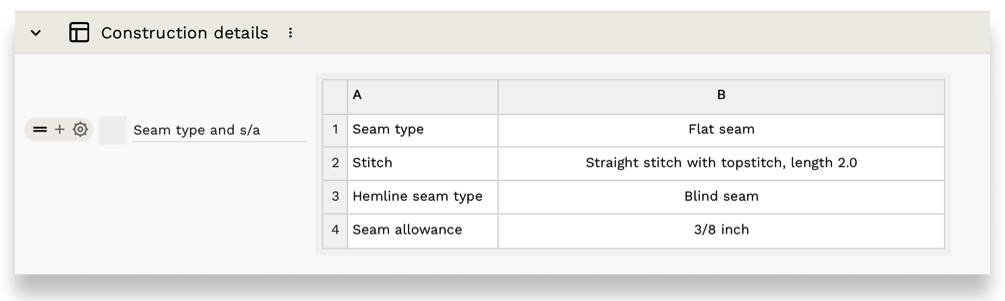
You can also add seam allowance to your construction page so the manufacturer knows what will be acceptable during quality control checks.
What are garment measurement tolerances
Garment measurement tolerance is the allowable limit of variation in a point of measurement. As mistakes in the production can happen, providing garment tolerances help make sure any discrepancies are within allowed limits. Therefore they are used for quality control.
Remember that beyond all the computer-aided design sketches, garments are confectioned by hand in the production stage. Unlike other products, the garment manufacturing process doesn’t benefit from fully end-to-end automation, at least yet.
Besides, it's more likely to find discrepancies in the specifications of clothing than other products, since each clothing style has different characteristics like special constructions, different weight and drape of the fabrics, or catering to different body types etc.
When it comes to creating your sizing measurement tables you should ideally provide a tolerance allowing for a small margin of error.
And therefore when creating the size measurement tables in your style tech pack, you should ideally provide a tolerance for each point of measurement. Since perfection in clothing is impossible, Tolerance allows a small margin of error, a plus-or-minus measurement that is acceptable and meets the quality standards.
Learn more in depth about Tolerance here.
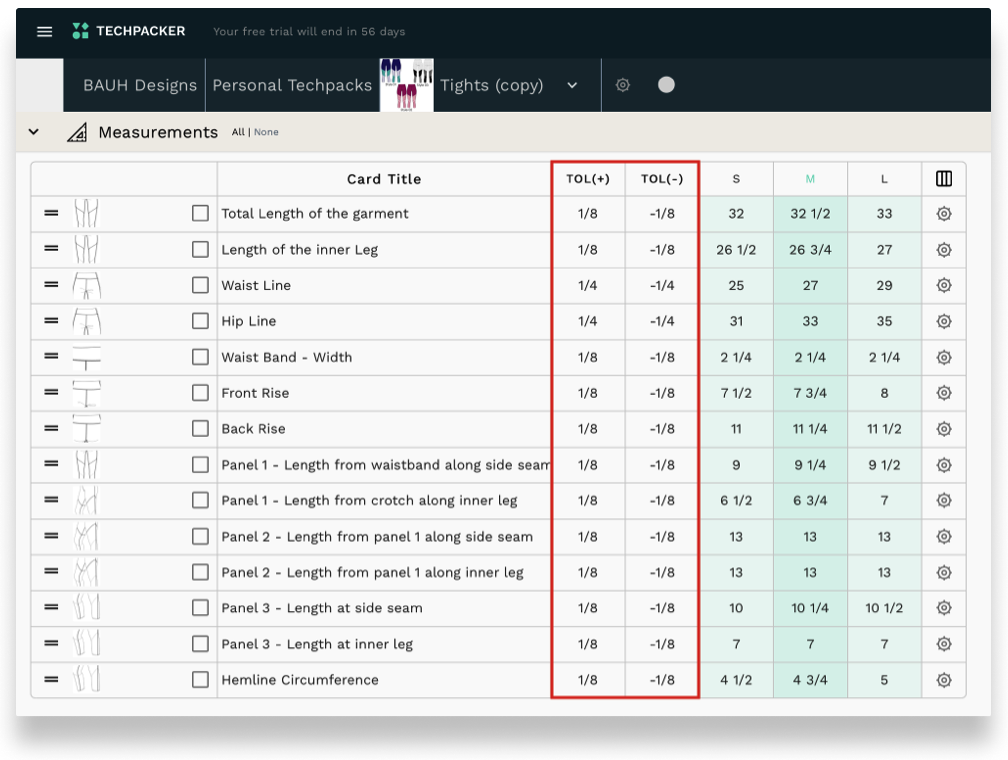
Measurements Tolerances are usually provided to manufacturers or QA (Quality assurance) professionals through measurement tables in the style tech packs.
If you use Teckpacker, you can easily add custom columns ( TOL+ OR TOL -) in your measurements chart and at any edit, re-arranges Point of measurements and generate/ send PDF ready tech packs right through the platform.
How to keep track of the fit of your samples
What do designers do after they receive a sample that doesn’t fit right? They request changes and order a new sample to be made by the manufacturer. To keep track of each round of approval and requested changes, a fit sheet is usually added in a tech pack.
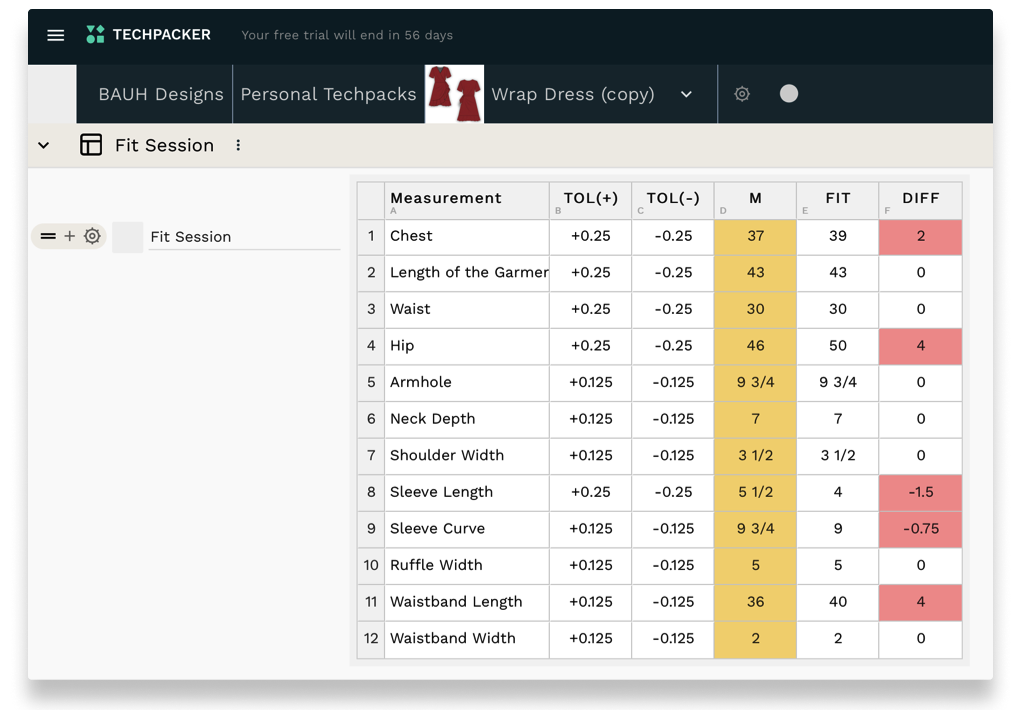
The Fit Sheet is an additional table in a tech pack where designers document each point of measurement of each physical sample. The main purpose of a Fit Sheet is to make sure each measurement is within provided tolerances.
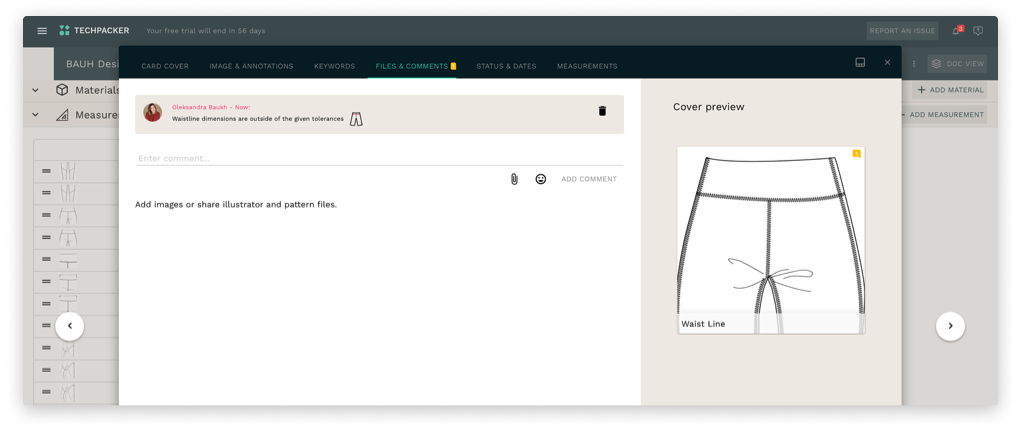
In Techpacker you can create cards for each Point of Measurement (POM) for example: sleeves, neckline, back etc. So changes can be done to each card versus the entire garment as you may only need to modify a specific measurement.
Switching to the list-view stack measurements cards in a tabular format to make garment inspection easier.
When a fit sample is received from the manufacturer you can add a custom column (like in the example above) and register the actual measurements. Your team can view this update live if they are working remotely.
There, you can enter the measurements of the sample piece quality control and compare it to the initial measurements in the table and check whether the particular dimensions are within tolerance.
This is why having cards (different “lines” in list view) makes the process a lot easier: if you used one image and drafted out all the measurement specifics, with sizing and notations, you wouldn’t be able to edit the card so easily: you risk getting it saturated with notes or not making it clear where the garment needs adjustment and confuse your team.
Let’s say you need to edit the collar drop for a shirt; then you only need to change that card (or line) containing the collar, not the entire card for the shirt. This also helps quality control catch any detail that may show up with the fit of collars in the future.
Adding notes to your Tech Pack and communicating with team members
If your QC team or inspector finds a significant discrepancy with tolerances, evidently the measurements will need to be adjusted. With Techpacker the card is automatically updated with the new measurements, so no need to go back and forth to notify the team.
So any fit changes and comments made will show up on the Techpacker card for that item. If your dimensions are outside of the given tolerances, this can represent a serious quality control problem because any discrepancies found are likely present in many other garments of that particular style or size.
When a factory makes changes, tech designers can be reminded of any fit issues they had in the initial process, thus allowing for better communication between all teams.
Later, when sending over the final tech pack to the factory you can hide the “fit” column, as there is no need for them to visualize the quality inspection part and they can just work with the final dimensions.