
Contents
Product development is a complex step-by-step process. Where the starting point is developing your fashion flat sketches, the final result is, of course, a finished product. In this blog post, we will discuss one of the stages that happen in between - developing a garment spec sheet in particular.
A garment spec sheet or measurement table is part of a tech pack in which a designer conveys technical recommendations and criteria to the manufacturer on how to make the garment. So, what exactly is a garment spec sheet, and how can it be properly prepared? Let's get into the nitty-gritty.
What is a garment spec sheet?
A garment specification (spec) sheet, or measurement table, is a technical document that contains all construction details of the garment. It looks like a technical diagram or a sketch of a garment, including all of its measurements. Spec sheets are used by designers to communicate design concepts to manufacturers.
A garment specification sheet includes:
- Garment sketches. Usually front and back views. For complex garments, additional detailed images may be needed.
- Measurement sheet for all sizes.
- Construction guidelines.
- Stitching details and seam types.
- Additional comments if needed.
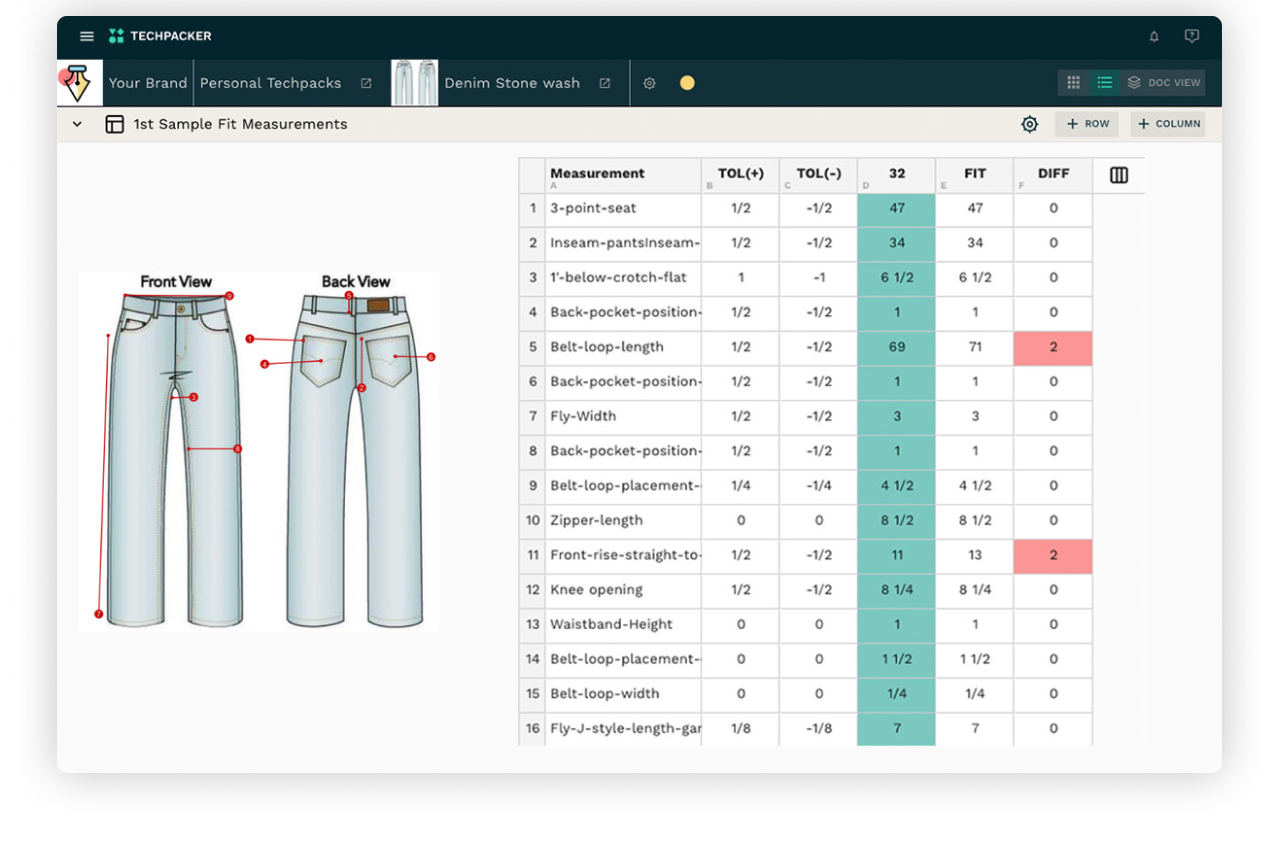
Let’s take a look at the example of a garment spec sheet.

Additional dimensions and parameters will assist us in achieving the proper fit of the produced product.
The spec sheet is then used by the manufacturer to create the pattern for the garment, grade it for different sizes, and lastly construct a sample.
The specification sheet may be changed once the first sample is created. If any adjustments are required, these will be recorded in the first spec sheet. The example is then modified by including all of the adjustments and comments. Once the final sample is approved, bulk production begins.
How to determine points of measurement and their specs
Once the design is approved, and we have the measurements on hand, we can start to determine garment measurements or specs. Some of these measurements will come directly from the body data, while we’ll add to the garment to determine the ease amount.
To explain how to come up with the garment measurements let’s take a look at this example of a Bell Sleeve Top.
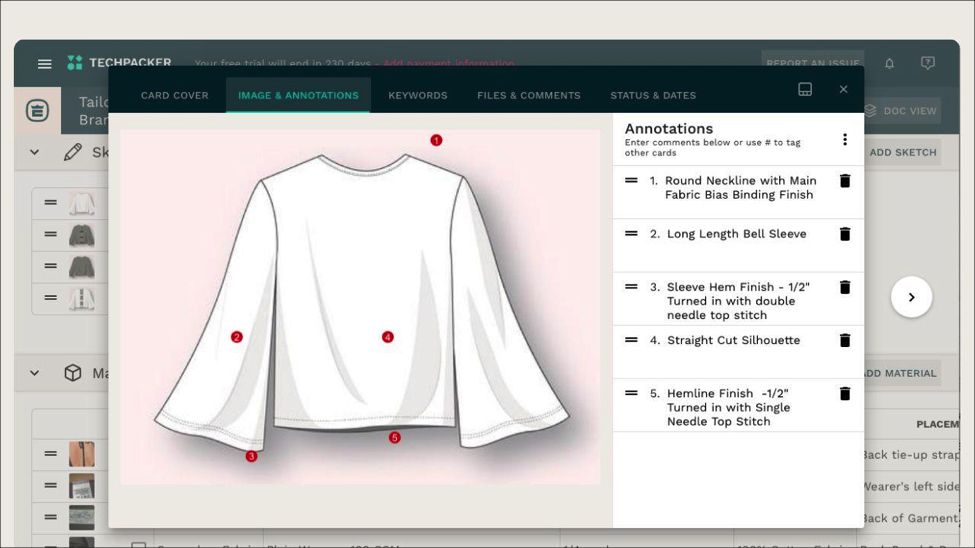
Our sketch shows that it’s a looser-fitting garment, which means it will have a fair amount of ease. Especially at the sleeve openings where it bells out. When you are working on a spec sheet for a top make sure you include measurements like chest, waist, hem, across the shoulder, and how closely the armhole fits the underarm.
For this tutorial, we will use woven fabric for our garment. Woven fabrics require more ease than knits due to their lack of stretch. For a loose-fitting woven garment, we need 6-8” of ease at the bust. Our base size body has a chest measurement of 34”, so let’s use a 40” full chest width, or 20” half chest.
We would then go through all of the needed points of measure (POM) to create our full garment specs.
One thing to keep in mind when creating your specs is the tolerance needed in production. Tolerance is the amount over or under (often expressed as +/-) the spec that is acceptable for a garment to pass quality control.
There are several things in the sewing and construction process that can cause small variances in the final garment measurements, so these need to be considered in the specs. Typically, the larger body measurements like chest or hip areas have a tolerance of +/- ½” while the smaller areas like a sleeve width or neck drop will have much smaller tolerance amounts.
One thing to watch for in determining your tolerance amounts is to make them large enough to account for necessary variation in production, but small enough that you won’t get any overlap between sizes. For example, if your size S has an 18” half chest and your size M has a 19.5” half chest, you wouldn’t want a 1” tolerance because that means that in production you could have a size S with a 19” half chest and a size M with an 18.5” half chest. This causes confusion and inconsistency for your consumer. By limiting the tolerance to +/- ½” you ensure that your largest S is 18.5” and your smallest M is 19”, ensuring there is no crossover.
How to create a measurements table
Garment spec sheets (or a measurement table) are developed by using a template in Excel or tech pack developing software. The file is then formatted in PDF and sent to the manufacturer along with the full factory-ready tech pack.
To create a measurement table you will need to measure your sample garment. To understand measurements and how to take them more successfully, follow our guide on how to master sizing and measuring in apparel.
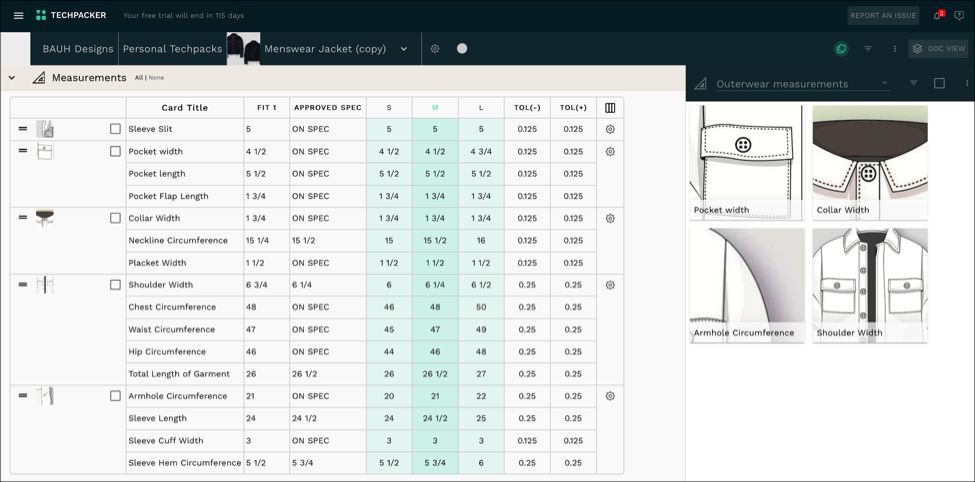
For a men’s jacket, for example, the measurements that you’ll need to include are:
- The total length of a garment;
- Hips, waist, and chest circumference;
- Shoulder width;
- Sleeve length, cuff width, and armhole circumference;
- Pocket width and length.
Take a look at the example below.
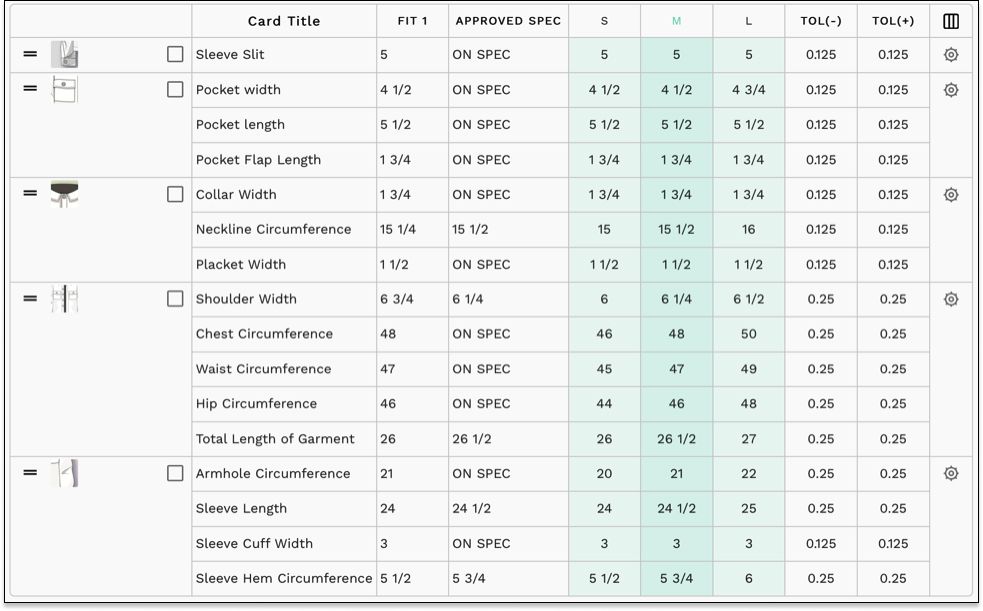
After adding measurements of the sample size (in our example it’s M) we provide the tolerance range. The tolerance range is added for each point of measurement to check them against each sample size, so you can request changes if they don’t fit in.
Next, we grade the garment for different sizes. Software that develops Tech packs, like Techpacker, completes this auto-grading for you based on the rule you provide. This helps speed up the process and avoid mistakes.
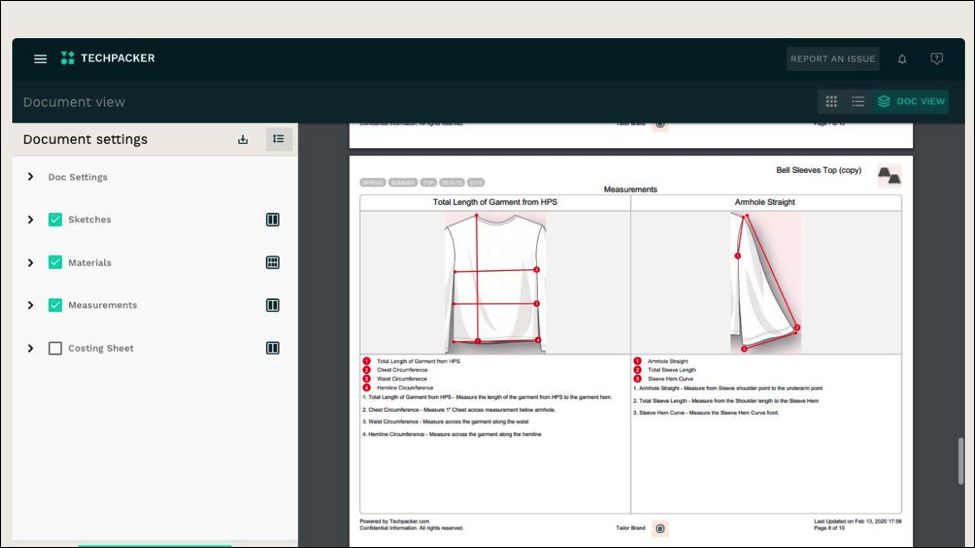
Point of measurement diagrams form the visual representation of your measurements. Use sketch diagrams and labeled arrows to show exactly where each measurement is on your garment. These are usually drawn in Adobe Illustrator along with the technical sketch of the garment. Techpacker lets you add callout annotations simply in one click while building your tech pack without jumping back and forth between the platforms.
Here is an example of the diagram for the pocket. We add points of measurement like pocket width, length, and flap length.
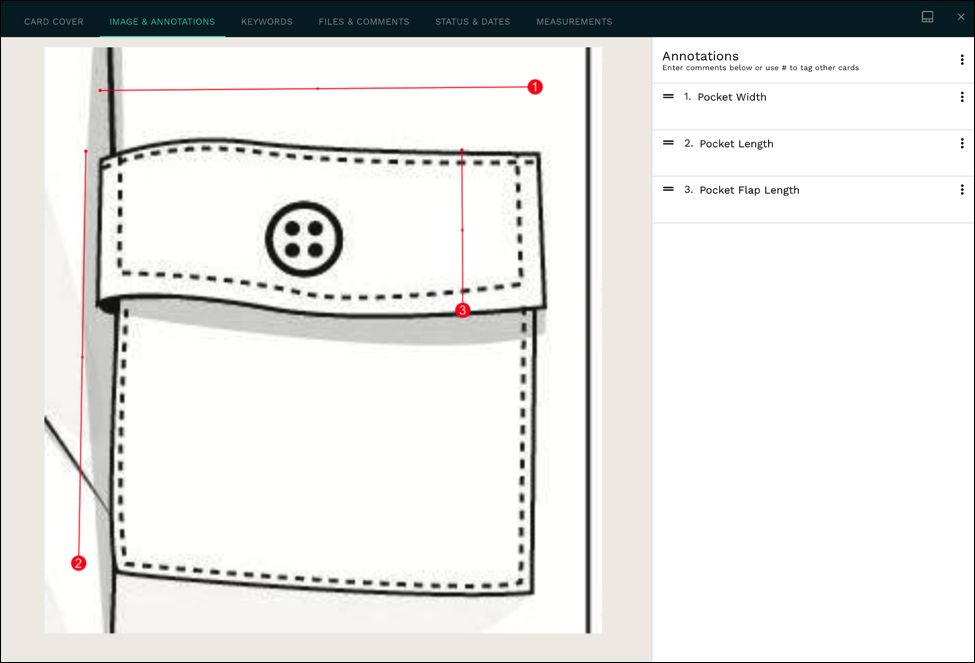
As you can see, callout annotations help us illustrate how the measurements should be taken by the manufacturer to avoid mistakes and confusion.
View the full spec sheet for the men’s Shirt here.
How to reuse measurement tables as templates
Creating a measurement table might seem like a lot of work. However, many points of measurement can be reused across multiple tech packs. Without any need to draft them from scratch all over again.
Measurements like collar width, neck drop, sleeve length, cuff width, pocket measurements, etc. can be easily repeated and re-used in seasonal collections, as well as utilized in new projects. Having those on hand and ready to use will save you a ton of time when building new tech packs.
With Techpacker you can create templates for future re-use in your measurement tables. At any time, you and your team can reuse these saved templates on any tech pack in just a few clicks. This feature will save you time and keep your measurements consistent across multiple tech packs.
|
Ready to create your own spec sheet? OR Request a demo
Manage your product development to production workflow with factories hastlefree. Try Techpacker. |
Other basic FAQ's
1. What’s the difference between a garment spec sheet and a tech pack?
A garment spec sheet is just one part of a tech pack — it focuses solely on measurements, construction details, and tolerances. A tech pack, on the other hand, includes everything needed to manufacture a garment: sketches, bill of materials, construction notes, trims, and grading rules.
If you’re new to tech packs, check out our detailed guide on How to Ace Your Technical Flat Sketches — the foundation of every great tech pack.
2. How do I decide which points of measurement (POM) to include in my garment spec sheet?
Your points of measurement depend on the type of garment and its construction. For example, a top might include bust, waist, sleeve length, and hem width, while trousers need inseam, outseam, and thigh width.
It’s important to base these measurements on both body data and garment ease. You can dive deeper into this process with our guide on Mastering Sizing and Measuring in Apparel.
3. How do grading rules work when creating spec sheets for different sizes?
Grading helps you scale your base garment measurements across different sizes (S, M, L, etc.) without redrawing each one manually.
On Techpacker, you can automate this process using the Grading Function, which applies your grading rules to all measurements consistently and reduces the chance of sizing errors.
4. How can I add callout annotations to show where measurements are taken?
Callout annotations visually indicate where each point of measurement lies on your garment sketch — helping manufacturers interpret your specs correctly.
You can easily add them directly within Techpacker while creating your tech pack. Learn how in our quick guide on How to Add Callout Annotations on Techpacker.
5. Can I reuse my measurement tables across multiple tech packs or styles?
Yes! That’s one of the most time-saving features in Techpacker. You can save measurement tables or individual spec cards as templates and reuse them across future styles or collections — ensuring measurement consistency.
Here’s how to Add Cards in a Techpack and build your own library of reusable spec sheets.
6. How do I maintain consistency in measurements across styles and collections?
Consistency comes from using standardized measurement templates and maintaining a clear change history in your spec sheets.
Tools like Techpacker and PLMBR help streamline version control, reduce manual errors, and keep your product data unified — especially if multiple team members are working on different product lines.
7. What are the most common mistakes designers make when creating garment spec sheets?
Some frequent mistakes include:
- Missing key POMs (like shoulder slope or armhole depth)
- Setting too wide a tolerance range
- Forgetting to update the spec sheet after fit corrections
- Not including visual callouts for clarity
Avoid these by following our guides on Sizing and Measuring in Apparel and Adding Callout Annotations to ensure your manufacturer interprets every spec correctly.